Adding zk archetype to maven in eclipse

Reading Time: < 1 minute

on eclipse or sts click on window > preferences

and  on the left pane menu go to Maven and expand the menu choose Archetypes here click on add remote catalog and type in

Catalog file: http://mavensync.zkoss.org/maven2/

Description: zk

click on okay. When you create a new maven project from the catalog choose zk and select your favorite zk maven project

Spring MVC Form Example

Reading Time: 3 minutes

In this tutorial I will show you how to create a simple form using Spring 3 MVC Web framework. I have checked other examples regarding creation of forms in Spring MVC Framework, there are many ways of achieving it. With the simplicity  of Spring MVC version 3, we are easing our forms to be implemented on forms. Especially we enjoy coding forms in spring avoiding definition of each command name or anything on xml configuration file. So let’s get started to Spring forms! We are creating a simple project adds and lists as many users as you enter. Also the project is on my Github as well, you may download the entire project

First of all we need essentially our POJO class, the below we are creating one

User.java

package com.tugrulaslan.domain;

/**
 * Created by Tugrul on 19.02.2014.
 */
public class User {

    private String firstName;
    private String lastName;
    private String email;
    private Integer age;

    public String getFirstName() {
        return firstName;
    }

    public void setFirstName(String firstName) {
        this.firstName = firstName;
    }

    public String getLastName() {
        return lastName;
    }

    public void setLastName(String lastName) {
        this.lastName = lastName;
    }

    public String getEmail() {
        return email;
    }

    public void setEmail(String email) {
        this.email = email;
    }

    public Integer getAge() {
        return age;
    }

    public void setAge(Integer age) {
        this.age = age;
    }

    @Override
    public String toString() {
        return "User{" +
                "firstName='" + firstName + '\'' +
                ", lastName='" + lastName + '\'' +
                ", email='" + email + '\'' +
                ", age=" + age +
                '}';
    }
}

MainController.java

package com.tugrulaslan.controller;

import com.tugrulaslan.domain.User;
import org.springframework.stereotype.Controller;
import org.springframework.web.bind.annotation.ModelAttribute;
import org.springframework.web.bind.annotation.RequestMapping;
import org.springframework.web.servlet.ModelAndView;

import java.util.ArrayList;
import java.util.List;

/**
 * Created by Tugrul on 19.02.2014.
 */
@Controller
public class MainController {

    private List<User> allUserList = new ArrayList<User>();

    @RequestMapping(value = "/user-form")
    public ModelAndView personPage(){
        return new ModelAndView("user-page", "userCommand", new User());
    }

    @RequestMapping(value = "/addUser")
    public ModelAndView processPerson(@ModelAttribute User user){
        ModelAndView modelAndView = new ModelAndView();
        modelAndView.setViewName("user-result-page");
        modelAndView.addObject("user", user);
        allUserList.add(user);
        return modelAndView;
    }

    @RequestMapping(value = "/listUsers")
    public ModelAndView listAllPerson(){
        ModelAndView modelAndView = new ModelAndView();
        modelAndView.setViewName("user-list");
        modelAndView.addObject("users",allUserList);

        return modelAndView;
    }
}

Here is the important point what we need to focus on “userCommand” in “personPage”, we need to combine and link our controller to the desired form area, also the form variables need to be hooked up with the domain object, on the 3rd parameter we are sending a new class of User POJO the below evaluate the

user-page.jsp

<%--
  Created by IntelliJ IDEA.
  User: Tugrul
  Date: 19.02.2014
  Time: 11:19
  To change this template use File | Settings | File Templates.
--%>
<%@ page contentType="text/html;charset=UTF-8" language="java" %>
<%@taglib uri="http://www.springframework.org/tags/form" prefix="form"%>

<html>
<head>
    <title>Person Form</title>
</head>
<body>
<form:form method="post" commandName="userCommand" action="addUser.html">
    <table>
        <tbody>
        <tr>
            <td><form:label path="firstName">Firstname: </form:label></td>
            <td><form:input path="firstName" /></td>
        </tr>
        <tr>
            <td><form:label path="lastName">Lastname: </form:label></td>
            <td><form:input path="lastName" /></td>
        </tr>
        <tr>
            <td><form:label path="email">Email: </form:label></td>
            <td><form:input path="email" /></td>
        </tr>
        <tr>
            <td><form:label path="age">Age: </form:label></td>
            <td><form:input path="age" /></td>
        </tr>
        <tr>
            <td colspan="2">
                <input type="submit" value="Add User" />
            </td>
        </tr>
        </tbody>
    </table>
</form:form>

</body>
</html>

As we see the simple form here, we have combined our controller and User POJO class with each other to provide the communication.

user-list.jsp

<%--
  Created by IntelliJ IDEA.
  User: Tugrul
  Date: 19.02.2014
  Time: 11:40
  To change this template use File | Settings | File Templates.
--%>
<%@ page contentType="text/html;charset=UTF-8" language="java" %>
<%@taglib prefix="c" uri="http://java.sun.com/jsp/jstl/core" %>
<html>
<head>
    <title>Person List</title>
</head>
<body>
<h1>User List</h1>
<c:if test="${not empty users}">
    <table border="1">
        <tr>
            <td>Firstname</td>
            <td>Lastname</td>
            <td>Email</td>
            <td>Age</td>
        </tr>
        <c:forEach var="element" items="${users}">
            <tr>
                <td>${element.firstName}</td>
                <td>${element.lastName}</td>
                <td>${element.email}</td>
                <td>${element.age}</td>
            </tr>
        </c:forEach>
    </table>
</c:if>
<a href="/">Index</a><br />
</body>
</html>

Here we are listing all registered and stored users in our list defined in our controller class

user-result-page.jsp

<%--
  Created by IntelliJ IDEA.
  User: Tugrul
  Date: 19.02.2014
  Time: 11:23
  To change this template use File | Settings | File Templates.
--%>
<%@ page contentType="text/html;charset=UTF-8" language="java" %>
<html>
<head>
    <title>Person Result Page</title>
</head>
<body>
<h1>Created User Details</h1>
<p><b>First Name:</b> ${user.firstName}</p>
<p><b>Last Name:</b> ${user.lastName}</p>
<p><b>Email:</b> ${user.email}</p>
<p><b>Age:</b> ${user.age}</p>
<a href="/">Index</a>
</body>
</html>

where we show the outcome what the user has entered

index.jsp

<%--
  Created by IntelliJ IDEA.
  User: Tugrul
  Date: 19.02.2014
  Time: 11:40
  To change this template use File | Settings | File Templates.
--%>
<html>
<body>
<h2>===Main Menu===</h2>
</body>
<a href="/user-form">Add a New User</a><br />
<a href="/listUsers">List All Users</a>
</html>

Web.xml

<web-app xmlns="http://java.sun.com/xml/ns/javaee" xmlns:xsi="http://www.w3.org/2001/XMLSchema-instance"
         xsi:schemaLocation="http://java.sun.com/xml/ns/javaee
	      http://java.sun.com/xml/ns/javaee/web-app_2_5.xsd"
         version="2.5">

    <display-name>Archetype Created Web Application</display-name>
    <servlet>
        <servlet-name>mvc-dispatcher</servlet-name>
        <servlet-class>org.springframework.web.servlet.DispatcherServlet</servlet-class>
        <load-on-startup>1</load-on-startup>
    </servlet>

    <servlet-mapping>
        <servlet-name>mvc-dispatcher</servlet-name>
        <url-pattern>/</url-pattern>
    </servlet-mapping>

    <context-param>
        <param-name>contextConfigLocation</param-name>
        <param-value>/WEB-INF/mvc-dispatcher-servlet.xml</param-value>
    </context-param>

    <listener>
        <listener-class>
            org.springframework.web.context.ContextLoaderListener
        </listener-class>
    </listener>
</web-app>

mvc-dispatcher-servlet.xml

<beans xmlns="http://www.springframework.org/schema/beans"
               xmlns:xsi="http://www.w3.org/2001/XMLSchema-instance" xmlns:p="http://www.springframework.org/schema/p"
               xmlns:context="http://www.springframework.org/schema/context" xmlns:tx="http://www.springframework.org/schema/tx"
               xmlns:util="http://www.springframework.org/schema/util" xmlns:jee="http://www.springframework.org/schema/jee"
               xmlns:lang="http://www.springframework.org/schema/lang" xmlns:mvc="http://www.springframework.org/schema/mvc"
               xsi:schemaLocation="http://www.springframework.org/schema/beans
                        http://www.springframework.org/schema/beans/spring-beans.xsd
                        http://www.springframework.org/schema/context
                        http://www.springframework.org/schema/context/spring-context.xsd
                        http://www.springframework.org/schema/mvc
                        http://www.springframework.org/schema/mvc/spring-mvc.xsd
                        http://www.springframework.org/schema/jee http://www.springframework.org/schema/jee/spring-jee.xsd
        				http://www.springframework.org/schema/lang http://www.springframework.org/schema/lang/spring-lang.xsd
        				http://www.springframework.org/schema/tx http://www.springframework.org/schema/tx/spring-tx.xsd
        				http://www.springframework.org/schema/util http://www.springframework.org/schema/util/spring-util.xsd">

<context:component-scan
        base-package="com.tugrulaslan.controller" />

<bean
        class="org.springframework.web.servlet.view.InternalResourceViewResolver">
    <property name="prefix">
        <value>/WEB-INF/jsp/</value>
    </property>
    <property name="suffix">
        <value>.jsp</value>
    </property>
</bean>

<mvc:annotation-driven />

</beans>

pom.xml

<project xmlns:xsi="http://www.w3.org/2001/XMLSchema-instance" xmlns="http://maven.apache.org/POM/4.0.0"
         xsi:schemaLocation="http://maven.apache.org/POM/4.0.0 http://maven.apache.org/maven-v4_0_0.xsd">
    <modelVersion>4.0.0</modelVersion>
    <groupId>com.tugrulaslan</groupId>
    <artifactId>SpringFormExample</artifactId>
    <packaging>war</packaging>
    <version>1.0-SNAPSHOT</version>
    <name>SpringFormExample Maven Webapp</name>
    <url>http://maven.apache.org</url>

    <properties>
        <org.springframework.version>3.2.6.RELEASE</org.springframework.version>
    </properties>

    <dependencies>
        <dependency>
            <groupId>junit</groupId>
            <artifactId>junit</artifactId>
            <version>4.8.1</version>
        </dependency>

        <dependency>
            <groupId>jstl</groupId>
            <artifactId>jstl</artifactId>
            <version>1.2</version>
        </dependency>

        <dependency>
            <groupId>taglibs</groupId>
            <artifactId>standard</artifactId>
            <version>1.1.2</version>
        </dependency>


        <dependency>
            <groupId>org.springframework</groupId>
            <artifactId>spring-webmvc</artifactId>
            <version>${org.springframework.version}</version>
        </dependency>

        <dependency>
            <groupId>org.springframework</groupId>
            <artifactId>spring-context-support</artifactId>
            <version>${org.springframework.version}</version>
        </dependency>


        <dependency>
            <groupId>org.springframework</groupId>
            <artifactId>spring-orm</artifactId>
            <version>${org.springframework.version}</version>
        </dependency>

        <dependency>
            <groupId>org.springframework</groupId>
            <artifactId>spring-context</artifactId>
            <version>${org.springframework.version}</version>
        </dependency>

        <dependency>
            <groupId>org.springframework</groupId>
            <artifactId>spring-oxm</artifactId>
            <version>${org.springframework.version}</version>
            <scope>compile</scope>
        </dependency>

    </dependencies>
    <build>
        <finalName>SpringFormExample</finalName>
    </build>
</project>

Listing Active Directory users Spring LDAP

Reading Time: 3 minutes

Hi in this tutorial I will show you how to connect and retrieve user details on windows active directory server. So previously I have posted how to setup an active directory server on windows server 2008 enterprise edition

One by one i will give you the codes and find the full project on github. So let us get started

Person.java

A simple POJO class which holds user attributes

package com.tugrulaslan.domain;

/**
 * Created by Tugrul on 11.02.2014.
 */
public class Person {

    private String name;
    private String displayName;
    private String lastName;
    private String firstName;
    private String mail;
    private String userID;

    public String getName() {
        return name;
    }

    public void setName(String name) {
        this.name = name;
    }

    public String getDisplayName() {
        return displayName;
    }

    public void setDisplayName(String displayName) {
        this.displayName = displayName;
    }

    public String getLastName() {
        return lastName;
    }

    public void setLastName(String lastName) {
        this.lastName = lastName;
    }

    public String getFirstName() {
        return firstName;
    }

    public void setFirstName(String firstName) {
        this.firstName = firstName;
    }

    public String getMail() {
        return mail;
    }

    public void setMail(String mail) {
        this.mail = mail;
    }

    public String getUserID() {
        return userID;
    }

    public void setUserID(String userID) {
        this.userID = userID;
    }

    @Override
    public String toString() {
        return "Person{" +
                "name='" + name + '\'' +
                ", displayName='" + displayName + '\'' +
                ", lastName='" + lastName + '\'' +
                ", firstName='" + firstName + '\'' +
                ", mail='" + mail + '\'' +
                ", userID='" + userID + '\'' +
                '}';
    }
}

PersonAttributesMapper.java

We need this attribute mapper class to match the attributes on server with our Contact.java POJO class. we will be implementing Spring LDAP inherit the AttributesMapper interface to our class list of attributes windows servers

package com.tugrulaslan.utils;

import com.tugrulaslan.domain.Person;
import org.springframework.ldap.core.AttributesMapper;

import javax.naming.NamingException;
import javax.naming.directory.Attribute;
import javax.naming.directory.Attributes;

/**
 * Created by Tugrul on 11.02.2014.
 */
public class PersonAttributesMapper implements AttributesMapper{

    @Override
    public Object mapFromAttributes(Attributes attributes) throws NamingException {
        Person person = new Person();

        Attribute name = attributes.get("name");
        if (name != null){
            person.setName((String) name.get());
        }

        Attribute displayname = attributes.get("displayname");
        if (displayname != null){
            person.setDisplayName((String) displayname.get());
        }

        Attribute lastname = attributes.get("sn");
        if (lastname != null){
            person.setLastName((String) lastname.get());
        }

        Attribute firstname = attributes.get("givenname");
        if (firstname != null){
            person.setFirstName((String) firstname.get());
        }

        Attribute mail = attributes.get("mail");
        if (mail != null){
            person.setMail((String) mail.get());
        }

        Attribute userid = attributes.get("uid");
        if (userid != null){
            person.setUserID((String) userid.get());
        }

        System.out.println(person.toString());

        return person;
    }
}

PersonDAO.java

Our interface class holds methods will be implemented

package com.tugrulaslan.dao;

import com.tugrulaslan.domain.Person;

import java.util.List;

/**
 * Created by Tugrul on 11.02.2014.
 */
public interface PersonDAO {

    public List<Person> getAllPersons();

    public List findUserByCommonName(String commonName);
}

PersonDAOImpl.java

Our implementation class where we do process incoming request which is implemented to PersonDAO class.

package com.tugrulaslan.dao;

import com.tugrulaslan.domain.Person;
import com.tugrulaslan.utils.PersonAttributesMapper;
import org.springframework.ldap.core.LdapTemplate;
import org.springframework.ldap.filter.AndFilter;
import org.springframework.ldap.filter.EqualsFilter;
import java.util.ArrayList;
import java.util.List;

/**
 * Created by Tugrul on 11.02.2014.
 */

public class PersonDAOImpl implements PersonDAO{

    private LdapTemplate ldapTemplate;

    public void setLdapTemplate(LdapTemplate ldapTemplate) {
        this.ldapTemplate = ldapTemplate;
    }

    protected final static String baseDN = "OU=Domain Controllers";

    @Override
    public List<Person> getAllPersons() {
        List<Person> persons = new ArrayList<Person>();
        try {
            List search = ldapTemplate.search("", "(objectClass=person)", new PersonAttributesMapper());
            persons.addAll(search);
        } catch (Exception e) {
            System.out.println("Error: " + e);
        }
        return persons;
    }

    @Override
    public List findUserByCommonName(String commonName) {
            AndFilter andFilter = new AndFilter();
            andFilter.and(new EqualsFilter("objectclass","person"));
            andFilter.and(new EqualsFilter("cn", commonName));
            return ldapTemplate.search("", andFilter.encode(), new PersonAttributesMapper());
    }
}

pom.xml

<project xmlns:xsi="http://www.w3.org/2001/XMLSchema-instance" xmlns="http://maven.apache.org/POM/4.0.0"
         xsi:schemaLocation="http://maven.apache.org/POM/4.0.0 http://maven.apache.org/xsd/maven-4.0.0.xsd">
    <modelVersion>4.0.0</modelVersion>

    <groupId>com.tugrulaslan</groupId>
    <artifactId>SpringLDAP</artifactId>
    <version>1.0-SNAPSHOT</version>
    <packaging>jar</packaging>

    <name>SpringLDAP</name>
    <url>http://maven.apache.org</url>

    <properties>
        <org.springframework.version>3.2.6.RELEASE</org.springframework.version>
        <org.springframework.ldap.version>2.0.0.RELEASE</org.springframework.ldap.version>
        <org.springframework.security.version>3.1.3.RELEASE</org.springframework.security.version>
        <project.build.sourceEncoding>UTF-8</project.build.sourceEncoding>
    </properties>

    <dependencies>

        <dependency>
            <groupId>org.springframework.ldap</groupId>
            <artifactId>spring-ldap-core</artifactId>
            <version>${org.springframework.ldap.version}</version>
        </dependency>

        <dependency>
            <groupId>org.springframework.ldap</groupId>
            <artifactId>spring-ldap-core-tiger</artifactId>
            <version>${org.springframework.ldap.version}</version>
        </dependency>

        <dependency>
            <groupId>org.springframework.ldap</groupId>
            <artifactId>spring-ldap-odm</artifactId>
            <version>${org.springframework.ldap.version}</version>
        </dependency>

        <dependency>
            <groupId>org.springframework.ldap</groupId>
            <artifactId>spring-ldap-ldif-core</artifactId>
            <version>${org.springframework.ldap.version}</version>
        </dependency>

        <dependency>
            <groupId>org.springframework.ldap</groupId>
            <artifactId>spring-ldap-ldif-batch</artifactId>
            <version>${org.springframework.ldap.version}</version>
        </dependency>

        <dependency>
            <groupId>junit</groupId>
            <artifactId>junit</artifactId>
            <version>4.8.1</version>
        </dependency>

        <dependency>
            <groupId>jstl</groupId>
            <artifactId>jstl</artifactId>
            <version>1.2</version>
        </dependency>

        <dependency>
            <groupId>taglibs</groupId>
            <artifactId>standard</artifactId>
            <version>1.1.2</version>
        </dependency>


        <dependency>
            <groupId>org.springframework</groupId>
            <artifactId>spring-webmvc</artifactId>
            <version>${org.springframework.version}</version>
        </dependency>

        <dependency>
            <groupId>org.springframework</groupId>
            <artifactId>spring-context-support</artifactId>
            <version>${org.springframework.version}</version>
        </dependency>


        <dependency>
            <groupId>org.springframework</groupId>
            <artifactId>spring-orm</artifactId>
            <version>${org.springframework.version}</version>
        </dependency>

        <dependency>
            <groupId>org.springframework</groupId>
            <artifactId>spring-context</artifactId>
            <version>${org.springframework.version}</version>
        </dependency>

        <dependency>
            <groupId>org.springframework</groupId>
            <artifactId>spring-oxm</artifactId>
            <version>${org.springframework.version}</version>
            <scope>compile</scope>
        </dependency>


        <dependency>
            <groupId>org.springframework.security</groupId>
            <artifactId>spring-security-core</artifactId>
            <version>${org.springframework.security.version}</version>
        </dependency>

        <dependency>
            <groupId>org.springframework.security</groupId>
            <artifactId>spring-security-web</artifactId>
            <version>${org.springframework.security.version}</version>
        </dependency>

        <dependency>
            <groupId>org.springframework.security</groupId>
            <artifactId>spring-security-config</artifactId>
            <version>${org.springframework.security.version}</version>
        </dependency>
    </dependencies>
</project>

spring.xml

<beans xmlns="http://www.springframework.org/schema/beans"
       xmlns:xsi="http://www.w3.org/2001/XMLSchema-instance" xmlns:p="http://www.springframework.org/schema/p"
       xmlns:context="http://www.springframework.org/schema/context" xmlns:tx="http://www.springframework.org/schema/tx"
       xmlns:util="http://www.springframework.org/schema/util" xmlns:jee="http://www.springframework.org/schema/jee"
       xmlns:lang="http://www.springframework.org/schema/lang" xmlns:mvc="http://www.springframework.org/schema/mvc"
       xsi:schemaLocation="http://www.springframework.org/schema/beans
                        http://www.springframework.org/schema/beans/spring-beans.xsd
                        http://www.springframework.org/schema/context
                        http://www.springframework.org/schema/context/spring-context.xsd
                        http://www.springframework.org/schema/mvc
                        http://www.springframework.org/schema/mvc/spring-mvc.xsd
                        http://www.springframework.org/schema/jee http://www.springframework.org/schema/jee/spring-jee.xsd
        				http://www.springframework.org/schema/lang http://www.springframework.org/schema/lang/spring-lang.xsd
        				http://www.springframework.org/schema/tx http://www.springframework.org/schema/tx/spring-tx.xsd
        				http://www.springframework.org/schema/util http://www.springframework.org/schema/util/spring-util.xsd">


    <bean id="contextSource" class="org.springframework.ldap.core.support.LdapContextSource">
        <property name="url" value="ldap://IPORDOMAINADDR:389" />
        <property name="base" value=" DC=DOMAIN,DC=DOMAIN,DC=DOMAIN" />
        <property name="userDn" value="USERNAME" />
        <property name="password" value="PASSWORD" />

    </bean>

    <bean id="ldapTemplate" class="org.springframework.ldap.core.LdapTemplate">
        <constructor-arg ref="contextSource" />
        <property name="ignorePartialResultException" value="true" />
    </bean>

    <bean id="personDAO" class="com.tugrulaslan.dao.PersonDAOImpl">
        <property name="ldapTemplate" ref="ldapTemplate" />
    </bean>

</beans>

App.java

package com.tugrulaslan;

import com.tugrulaslan.dao.PersonDAO;
import com.tugrulaslan.domain.Person;
import org.springframework.beans.factory.BeanFactory;
import org.springframework.beans.factory.xml.XmlBeanFactory;
import org.springframework.core.io.ClassPathResource;
import org.springframework.core.io.Resource;

import java.util.List;

/**
 * Hello world!
 *
 */
public class App 
{
    public static void main( String[] args )
    {
        Resource resource = new ClassPathResource("spring.xml");
        BeanFactory beanFactory = new XmlBeanFactory(resource);
        System.out.println(beanFactory.toString());

        PersonDAO personDAO = (PersonDAO) beanFactory.getBean("personDAO");

        List<Person> getAllPersons = personDAO.getAllPersons();
        List findUserByCommonName = personDAO.findUserByCommonName("tugrul");

        System.out.println("All user size: " + getAllPersons.size());
        System.out.println("Found user size: " + findUserByCommonName.size());


    }
}

Final thoughts are that you might be curious how to find out the base value DCs is that log on to your server and type in

dsquery user -name

this command will give you a similar output like this

25

Oracle JNDI LDAP Connection Test

Reading Time: < 1 minute

If you want to test your ldap connection you may use this code. Please keep in mind when you create the project add Spring necessary jars as well as spring ldap and sun-jndi-ldapbp.jar

package springframeworkldapclient;

import java.util.Hashtable;
import javax.naming.Context;
import javax.naming.NamingException;
import javax.naming.ldap.InitialLdapContext;
import javax.naming.ldap.LdapContext;

public class LdapContextCreation {

    public static void main(String[] args) {
        LdapContextCreation ldapContxCrtn = new LdapContextCreation();
        LdapContext ctx = ldapContxCrtn.getLdapContext();
    }

    public LdapContext getLdapContext() {
        LdapContext ctx = null;
        try {
            Hashtable env = new Hashtable();
            env.put(Context.INITIAL_CONTEXT_FACTORY, "com.sun.jndi.ldap.LdapCtxFactory");
            env.put(Context.SECURITY_AUTHENTICATION, "Simple");
            env.put(Context.SECURITY_PRINCIPAL, "USERNAME");
            env.put(Context.SECURITY_CREDENTIALS, "PASSWORD");
            env.put(Context.PROVIDER_URL, "ldap://localhost:389");
            ctx = new InitialLdapContext(env, null);
            System.out.println("Connection Successful.");
        } catch (NamingException ex) {
            System.out.println("LDAP Connection: FAILED");
            System.out.println("Could not connect: " + ex);
        }
        return ctx;
    }
}

Primitive types and Literals

Reading Time: < 1 minute

There are 8 primitive types

  1. boolean
  2. char
  3. int
  4. long
  5. byte
  6. short
  7. double
  8. float

Boolean: one bit minimum capacity and has the value of true and false.

Char: 16 bit unsigned quantity hold character values. Range of value is 0 to 65,535.

Int: 32 bit signed quantity holds numbers. Range of value is -2,147,483,648 to 2,147,483,647.

Long: 64 bit signed quantity holds numbers. Range of value is -9,223,372,036,857,775,808 to 9,223,372,036,857,775,807.

Byte: 8 bit signed quantity holds numbers. Range of value is -128 to 127.

Short: 16 bit signed quantity holds numbers. Range of value is -32,768 to 32,767.

Double: 64 bit signed quantity holds double numbers. Range of value is about -1.7E308 to +1.7E308

Float: 32 bit signed quantity holds float numbers. Range of value is about 3.4E38 to 3.4E38

installing and configuring active directory server on microsoft server 2008

Reading Time: 5 minutes

In this tutorial I will show you how to install ldap on the other hand well known way Active directory. What active directory does is briefly you may read it on wikipedia 

Before we start, we need to assign a static ip address to our server, the below what i assigned for my server

19

I assume that you have successfully installed and updated your Server and let us get started with the installation first. On your keyboards press on Windows+R and type dcpromo which will launch the AD application

1

This will prepare our AD server and when the loader completed you will see this screen click on next

2

Dismiss the warning and click Next

3

Since this is our newly established server we are choosing the new forest option

4

Wee came to the important screen this is where we identify our domain name like on the internet google.com whatever, it is advised to use local names within local servers because when a client connected to the network or domain may get confused and cannot resolve the real server, I am identifying my server as aslan.corp.local

5

Checking the FQDN whether it may exist on the network

6

Forest function level, I am choosing Server 2008 R2 option, I am not familiar with these functions, to get informed better just google it

7

We need to install dns server for our server to be resolved on the network, automatically let it install

8

This screen is not a big deal click on yes

9

Choosing the destination for necessary stuff

10

Set the admin password for domain controller

11

Summary screen

12

And we are good to go

13

Dont forget to click on rebook on completion, so that the required restart will be achieved by the operation system automatically. This role installation may take up some time depending on your computer hardware.

So far there is one installation left the LDAP. On initial configuratin tasks windows click on add roles and on the list choose Active Directory Lightweight Directory Services and click on next

14

Next

15

Next

16

Now installation begins

17

And we are good to go with LDAP

18

So now lets add a user with full rights and we can give it a shot to see and add users computers on AD. Type in dsa.msc

Go to users and right click on the right pane and create a new user

20

give it a short name for now we can make this a temp admin out of the user

21

So this is a bit tricky part when we try to set windows server has a strong password sequence so that you need one upper letter in your password type something like Tugrul3445admin

22

So now time to grand the newly created user the domain and admin rights. Right click on the user and click on properties and navigate to the Members of tab

23

Click on add and give these rights

24

Click on Okay and Apply in the and we now have our user with full domain and admin rights. so lets try to list our domain users and groups. To see that we need to gather cn and dc names launch command line and type in this command

dsquery user -name <username>

You will see something like this:

25

I used JXplorer to browse through my AD server

The below example connection config

26

Dont forget to turn your firewall off or if you want to use the firewall then add the incoming ports the exceptions port of 398 SSL 698

All attributes of a user Microsoft AD

Active Directory Attribute list

Adding external jars to the local maven repository

Reading Time: < 1 minute

At work I faced a situation that I had to add external jar libraries into my maven project, since most of required Java packages offered by Maven the automation, I have come across with the situation that Business objects external jars needed to be imported into the project. So I have done a small research regarding the issue, here is the outcome. First of all keep all he required in an easy location. I put the files in a folder called “libs” located right underneath C root drive the command below will do the magic

C:\workspace\CMC_REPORTING>mvn install:install-file -Dfile={FILELOCATION} -DgroupId={GROUP/DOMAINNAME} -DartifactId={FILENAME} -Dversion={VERSION} -Dpackagi
ng=jar

This command is going to add the required file to your local maven repo and you will get to use it, sample output after you carry out this command is:

Microsoft Windows [Version 6.1.7601]
Copyright (c) 2009 Microsoft Corporation.  All rights reserved.

C:\lib>mvn install:install-file -Dfile=fedmaster.jar -DgroupId=com.sap -Dartifac
tId=fedmaster -Dversion=1.0 -Dpackaging=jar
[INFO] Scanning for projects...
[INFO]
[INFO] ------------------------------------------------------------------------
[INFO] Building Maven Stub Project (No POM) 1
[INFO] ------------------------------------------------------------------------
[INFO]
[INFO] --- maven-install-plugin:2.4:install-file (default-cli) @ standalone-pom
---
[INFO] Installing C:\lib\fedmaster.jar to C:\Users\akn522a\.m2\repository\com\sa
p\fedmaster\1.0\fedmaster-1.0.jar
[INFO] ------------------------------------------------------------------------
[INFO] BUILD SUCCESS
[INFO] ------------------------------------------------------------------------
[INFO] Total time: 0.365s
[INFO] Finished at: Mon Jan 20 09:21:16 EET 2014
[INFO] Final Memory: 2M/15M
[INFO] ------------------------------------------------------------------------
C:\lib>

After the screen the necessary .jar file has been successfully imported into our maven local repo. There is one point left needs to be done, adding the imported jar in our pom.xml file. As usual add the line to your pom.xml

<dependency>
		<groupId>com.sap</groupId>
		<artifactId>fedmaster</artifactId>
		<version>1.0</version>
</dependency>

This is all now deploy your project to your application server and give it a shot

Installing Maven on Linux, Windows and Mac

Reading Time: 3 minutes

Description

This post will show you to install and configure maven on Windows, Linux and Mac. Before performing the installation, make sure the Java Development Kit is properly installed and configured. For Linux you can refer to my post

Linux

For this installation I have performed the task on Debian 10 64 bit, but also referred the same for other distros, it all turned out to be working perfectly. You can use the manual way to perform installation on other distros. For this make sure the java

Installing using the Package Manager

sudo apt install maven

Installing Manually

Navigate to Apache Maven’s official web site and and download the latest version (3.6.3 as of writing this article) the binary tar.gz package.

1. Unpack the Tar file

tar zxvf apache-maven-3.6.3-bin.tar.gz 

2. Move the folder to the opt folder

sudo mv apache-maven-3.6.3 /opt/

3.Create a Maven profile file

sudo nano /etc/profile.d/maven.sh

3.1. Add these lines in the “.sh” file

export M2_HOME=/opt/apache-maven-3.6.3
export PATH=${M2_HOME}/bin:${PATH}

4. Make the file executable and Reload the “sh” file in the system

sudo chmod +x /etc/profile.d/maven.sh
source /etc/profile.d/maven.sh

5. Check the Maven installation

mvn --version

Apache Maven 3.6.3 (cecedd343002696d0abb50b32b541b8a6ba2883f)
Maven home: /opt/apache-maven-3.6.3
Java version: 1.8.0_221, vendor: Oracle Corporation, runtime: /usr/java/jdk1.8.0_221/jre
Default locale: en_US, platform encoding: UTF-8
OS name: "linux", version: "4.19.0-8-amd64", arch: "amd64", family: "unix"

Windows

Download the binary file in .zip or tar.gz does not matter extract the folder under C drive if you want you may create the folder wherever you want, but to make it easier you shall consider practical way of it, after you extract the folder

Right Click Computer and click on Properties

windows1

On the left side of the properties, click on Advanced system settings

windows2

Below click on Environment Variables

windows3

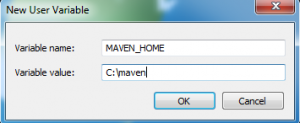
Click on “New” on Users variables and enter the details as below

windows4

and on system variables find PATH and add the line

windows5

and now lets launch command line and see if its configured

windows6

Mac OS

Normally maven comes out of package on mac os operating systems since 10.6.8 Snow Leopard, test if the maven is installed on your mac launch terminal and enter the command:

mvn -version
Apache Maven 3.0.3 (r1075438; 2011-02-28 19:31:09+0200)
Maven home: /usr/share/maven
Java version: 1.7.0_45, vendor: Oracle Corporation
Java home: /Library/Java/JavaVirtualMachines/jdk1.7.0_45.jdk/Contents/Home/jre
Default locale: en_US, platform encoding: UTF-8
OS name: "mac os x", version: "10.8.5", arch: "x86_64", family: "mac"
Tugruls-Mac:~ tugrulaslan$

to install it manually as the above linux package file download and exract the file the same way

tar -zxvf apache-maven-3.1.1-bin.tar.gz
sudo mv apache-maven-3.1.1 /usr/lib/maven
vim ~/.bash_profile

and these lines

export M2_HOME=/usr/lib/maven
export PATH=$PATH:$M2_HOME/bin

before you proceed the maven installation, please make sure that you have successfully carried out jre and jdk installation and configuration

Maven goals

Reading Time: < 1 minute
  • validate – validate the project is correct and all necessary information is available
  • compile – compile the source code of the project
  • test – test the compiled source code using a suitable unit testing framework. These tests should not require the code be packaged or deployed
  • package – take the compiled code and package it in its distributable format, such as a JAR.
  • integration-test – process and deploy the package if necessary into an environment where integration tests can be run
  • verify – run any checks to verify the package is valid and meets quality criteria
  • install – install the package into the local repository, for use as a dependency in other projects locally
  • deploy – done in an integration or release environment, copies the final package to the remote repository for sharing with other developers and projects.